
Finding the Right Greenhouse Assembly Instructions PDF for Your Kit
# Finding and Using Greenhouse Assembly Instructions PDF
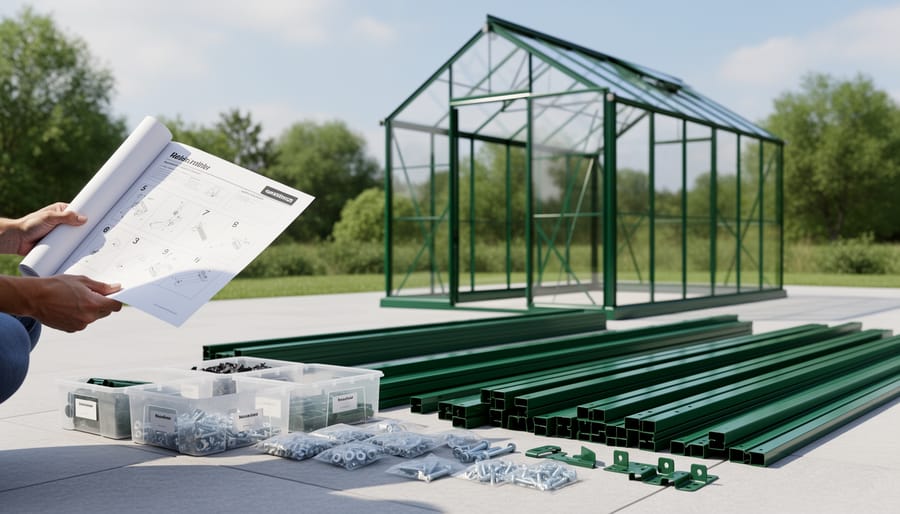
You’ve unpacked your new greenhouse only to discover the instructions are missing, or maybe you’re smart enough to preview what you’re getting into before buying. Either way, tracking down the right greenhouse assembly instructions PDF can save you hours of frustration and prevent costly mistakes.
Start by checking the manufacturer’s website directly. Most reputable greenhouse companies maintain downloadable PDF libraries organized by model number, which you’ll find stamped on a metal plate near the door frame or printed on the original packaging. If the company website comes up empty, search “[Brand Name] [Model Number] assembly instructions PDF” in Google. You’ll often find instructions hosted on retailer sites, customer forums, or manual archives like ManualsLib.
Before you commit to following any PDF you find online, verify it matches your exact model. Greenhouse designs change between production years, and using instructions for a similar but different model leads to leftover parts and structural weaknesses. Compare the parts diagram in the PDF against what’s actually in your box. The quantities should match perfectly.
Pay attention to the instruction quality itself. Well-written PDFs include clear diagrams with labeled parts, step-by-step photos, and specific torque requirements for bolts. Poor instructions feature blurry images, vague language like “attach using appropriate fasteners,” or translated text that doesn’t quite make sense. If your PDF falls into the latter category, search YouTube for your model number. Someone has likely posted a build video that clarifies the confusing steps.
Why Your Greenhouse Assembly Instructions PDF Matters More Than You Think
Those assembly instructions sitting in your downloads folder aren’t just a formality, they’re your blueprint for avoiding expensive mistakes and hours of backtracking. A quality PDF guide does more than list steps; it shows you the correct sequence for frame assembly, the proper orientation for panels, and critical connection points that determine whether your greenhouse withstands wind or becomes a pile of expensive debris after the first storm.
When instructions go missing or arrive poorly written, homeowners make predictable errors. They install glazing panels upside down, missing the drainage channels that prevent water pooling. They overtighten bolts during early assembly phases, only to discover they needed adjustment room for later steps. They skip foundation-leveling guidance and end up with doors that won’t close properly, a problem that’s nearly impossible to fix once the structure is complete. These aren’t minor inconveniences; they’re structural issues that compromise your greenhouse’s performance and longevity.
Warning: Assembling without instructions often leads to reversed panels, stripped bolts from incorrect sequencing, and misaligned frames that cause permanent door and ventilation problems.
The difference between clear and confusing instructions shows up immediately in your assembly experience. Good PDFs include exploded diagrams that reveal how components fit together, callouts identifying similar-looking parts, and warnings before irreversible steps. Poor instructions use tiny photos, skip critical orientation details, or assume knowledge you don’t have. The frustration isn’t just emotional, it costs real time and money when you need to disassemble sections, order replacement parts you damaged through guesswork, or hire someone to fix what went wrong.
Even experienced DIYers benefit from manufacturer-specific instructions because every greenhouse kit has unique quirks: proprietary clips, specific torque requirements, or assembly sequences that differ from similar models. Your PDF isn’t telling you what you already know, it’s preventing you from making assumptions that seem logical but aren’t correct for your particular kit.
Where to Find Assembly Instructions PDFs for Your Greenhouse Kit
When you need assembly instructions for your greenhouse, start with the manufacturer’s website. Most companies maintain downloadable PDF libraries organized by product model and year. Look for sections labeled “Support,” “Downloads,” “Product Manuals,” or “Assembly Guides.” You’ll typically need your model number, which appears on the product box, purchase receipt, or a metal plate attached to the greenhouse frame itself.
If the website search comes up empty, check inside the greenhouse packaging thoroughly. Manufacturers sometimes tuck instruction booklets into unexpected places like the door frame packaging, base rail sections, or taped to larger panels. The PDF might also be accessible through a QR code printed on the box or included on a USB drive with some premium models.
Contact customer service directly when online searches fail. Have your model number, purchase date, and retailer information ready. Most manufacturers email PDFs within 24-48 hours at no charge. Some companies even text download links immediately during your call. If you bought a discontinued model, ask whether a similar current model uses compatible instructions.
Retailer websites where you purchased the kit often host manufacturer PDFs in their product listings. Check the “Documents” or “Specifications” tabs on the original product page. Big-box home improvement stores frequently maintain these resources even after you’ve completed your purchase.
Third-party manual repositories can help when manufacturer resources disappear. Websites like ManualsLib, ManualsOnline, and specific greenhouse enthusiast forums archive thousands of assembly guides. Search by brand name and model number. While these sources work well for popular brands, obscure or imported kits may not appear in these databases.
For specialty structures like a shed-greenhouse comboyou might need instructions from multiple sources since these hybrid designs sometimes combine components from different product lines.
When instructions are truly unavailable, request help in online greenhouse communities. Post clear photos of your unassembled kit with any visible branding or part numbers. Experienced members often recognize models and share copies of their PDFs or detailed assembly notes. YouTube searches using your greenhouse brand and model sometimes reveal assembly videos that serve as visual instruction alternatives.
What to Look for in Quality Greenhouse Assembly Instructions
Not all greenhouse assembly PDFs are created equal. Before you start unpacking boxes and sorting parts, spend ten minutes evaluating your instruction manual. A poorly written PDF can turn a straightforward project into a frustrating guessing game, while a quality one makes assembly almost enjoyable.
Start with the parts list. The best instruction PDFs include a photographed or illustrated inventory showing every piece, not just a text list. Each component should have a unique identifier (like “Panel A” or “Bracket #7”) that matches labels throughout the assembly steps. Check whether your parts list distinguishes between similar-looking pieces. If it shows three different bracket types side by side with measurements and clear images, you’re in good hands. If it just says “various brackets,” prepare for confusion.
Next, examine the diagrams. Quality instructions feature detailed illustrations from multiple angles, especially for complex joints where the framing material connects. Look for exploded-view diagrams that show how parts fit together before they’re assembled. Arrows indicating direction matter more than you’d think. The best PDFs zoom in on tricky connections and show exactly where each bolt goes.
Sequential numbering is non-negotiable. Steps should progress logically, and each instruction should reference specific parts by their list identifiers. “Attach Panel C to Frame Rail 2 using four M6 bolts” beats “attach the panel to the frame” every time. Quality instructions also warn you before points of no return, like “do not fully tighten bolts until step 12.”
Hardware identification separates excellent instructions from mediocre ones. A chart showing actual-size bolt heads, nuts, and washers helps tremendously when you’re staring at a pile of similar fasteners. Some manufacturers print this chart on a separate page you can keep beside your hardware pile.
Finally, check for a troubleshooting section or FAQ. This shows the manufacturer anticipated common problems. Questions like “What if the door doesn’t align?” or “How do I fix a panel that won’t seat properly?” indicate they’ve learned from customer feedback and want to help you succeed.
If your PDF lacks these elements, don’t panic. Just know you’ll need patience and possibly online supplements to fill the gaps.
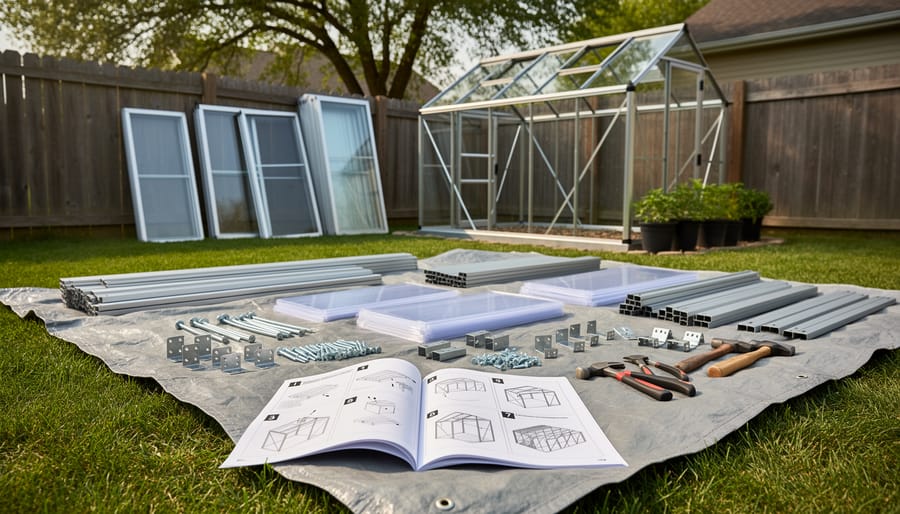
Essential Tools You’ll Need (According to Most Instruction PDFs)
Most greenhouse assembly PDFs list similar core tools regardless of the kit you’ve purchased, though the specific requirements vary based on your greenhouse’s frame material and glazing type. Before you open that box, take twenty minutes to gather everything you’ll need, it beats stopping mid-assembly to hunt for a missing screwdriver.
Your instruction manual will typically include detailed hardware like bolts, nuts, washers, and specialized clips. Some manufacturers throw in a basic Allen key or wrench sized for their specific fasteners. However, you’ll need to supply the actual tools for assembly.
| Greenhouse Type | Essential Tools | Helpful Extras |
|---|---|---|
| Metal Frame (aluminum/steel) | Phillips screwdriver, adjustable wrench, rubber mallet, level | Power drill with bits, socket set, work gloves |
| Polycarbonate Panels | Utility knife, tape measure, Phillips/flat screwdriver, ladder | Silicone sealant, panel cutter, safety glasses |
| Wood-Framed | Cordless drill, saw, level, hammer, tape measure, square | Clamps, wood glue, sandpaper, stain/sealant |
The PDFs for metal-framed greenhouses emphasize hand tools over power tools. You’ll use screwdrivers and wrenches constantly to connect frame pieces, so quality matters. A rubber mallet helps tap panels and frames into place without damaging them. Polycarbonate glazing requires careful handling, your instructions will warn against over-tightening screws, which can crack the panels. Keep a utility knife handy for trimming rubber seals to fit.
Wood-framed kits demand more carpentry tools, especially if you’re building from a plan rather than a pre-cut kit. A cordless drill speeds up the process significantly, and you may need to cut lumber to length depending on the design.
One tool that rarely appears in manufacturer lists but proves invaluable: a step stool or small ladder. You’ll be reaching overhead to install roof panels and upper frame pieces, and safe footing matters. Also grab a pencil for marking, masking tape for temporarily holding pieces, and a bucket for organizing small hardware by assembly stage.
Check your PDF’s tool list against what you own a full day before starting. Borrowing or buying missing items beats discovering you need them when you’re three hours into assembly with a partially-built frame sitting in your yard.
How Much Time Does Greenhouse Assembly Really Take?
Manufacturer estimates typically suggest 4-6 hours for assembly, but that’s rarely the whole story. A small 8×8 greenhouse size might take a moderately handy person 6-8 hours on their first build, while larger 10×12 models can stretch to 12-16 hours. If you’re tackling a four-season greenhouse with insulated panels and more complex framing, plan for the upper end of that range or beyond.
Several factors affect your actual assembly time. Experience matters considerably, if you’ve built a shed or similar structure before, you’ll move faster than someone using a drill for the first time. Working alone versus with a helper can double your timeline, since many steps require holding pieces in place while securing them. Weather plays a role too; assembling in 90-degree heat or fighting wind that keeps blowing panels around will slow you down.
Your site preparation dramatically impacts timing. If you’re working on a level, prepared foundation, you’ll save hours compared to starting on uneven ground that requires adjustment. Having all your tools organized and within reach prevents those frustrating trips back to the garage mid-assembly.
Don’t expect to finish in one session. Most homeowners find it more realistic to spread assembly over a weekend, working 3-4 hours at a time. This prevents fatigue-related mistakes and gives you time to puzzle through confusing instruction steps without rushing. The PDF might say four hours, but budget at least double that for your first greenhouse build. You’re not slow, you’re being thorough, and that’s what leads to a structure that’ll last years without problems.
Solo Assembly vs. Team Effort: What the Instructions Won’t Tell You
Most greenhouse assembly instructions PDFs will include a vague note like “two-person assembly recommended,” but they rarely tell you which specific steps are nearly impossible alone and which you can handle solo. The reality is more nuanced than manufacturers typically admit.
For small greenhouse kits (6×8 feet or smaller), one person can manage most of the assembly if you’re patient and methodical. The frame assembly, door installation, and attaching ground anchors are all feasible solo projects. You’ll work more slowly, but it’s doable with careful planning.
The story changes dramatically when you’re installing panels or roof sections on medium to large greenhouses. Holding a four-foot polycarbonate panel steady while aligning it with frame channels and securing clips requires at least three hands, not two. Wind becomes your enemy here, a gust can turn an unsecured panel into a kite or, worse, a cracked piece of expensive plastic.
Tip: Roof panel installation and gable end assembly are the two steps where a second person isn’t just helpful, it’s practically essential for safety and avoiding damage to materials.
Here’s what instruction PDFs won’t mention: even if you recruit help, that person doesn’t need to be handy. For panel installation, you mainly need someone to hold materials steady while you do the technical work of aligning and fastening. A neighbour, spouse, or teenager can fill this role perfectly fine.
Base assembly and foundation work, on the other hand, genuinely benefits from two people who know what they’re doing. Getting the frame square and level sets up everything that follows, and having a second set of eyes to check measurements prevents costly mistakes that compound as you build upward.
Consider timing your solo work for calm weather days and save the two-person tasks for when help is available. There’s no shame in splitting the project across multiple weekends to match helper availability.

Making Sense of Confusing Instructions: Common Problems and Solutions
Even well-established greenhouse manufacturers sometimes produce PDFs with frustrating gaps. You might encounter diagrams that don’t match your actual parts, steps that skip crucial details, or translations so awkward you can’t decipher what they mean.
When your instructions reference “Panel A” but your panels aren’t labeled, lay out all components and photograph them from multiple angles. Compare these photos to the PDF diagrams, matching pieces by shape, size, and pre-drilled holes rather than relying on labels alone. This visual catalog becomes your reference when the instructions say to attach something you can’t identify by name.
Poorly translated PDFs often use confusing terminology or backwards sequences. If a step doesn’t make logical sense, look ahead two or three steps to see what you’re building toward. Sometimes understanding the end goal clarifies a muddled instruction. When translation issues make hardware names incomprehensible, the hardware count and diagram shapes matter more than the words.
Missing information is trickier. If your PDF skips over how pieces connect or which direction a panel faces, search online for your exact greenhouse model number plus “assembly video” or “build guide.” YouTube often has homeowners who’ve filmed their builds, showing angles and sequences the PDF omitted. Greenhouse forums and Facebook groups dedicated to your brand are goldmines for finding others who’ve solved the same puzzle.
Check the manufacturer’s website directly, not just where you downloaded the original PDF. Many companies quietly update instructions after discovering common confusion points, posting revised versions without announcing changes. The newer file might clarify exactly what stumped you.
When truly stuck, photograph the problematic step and your parts, then post to relevant online communities. Experienced greenhouse owners can usually identify what you’re missing or misunderstanding within hours. They’ve often navigated the same unclear instructions and developed workarounds that should have been in the PDF from the start.
Taking the time to locate and thoroughly review your greenhouse assembly instructions PDF before you start building isn’t just helpful, it’s essential. Those few extra hours spent understanding the steps, gathering the right tools, and lining up an extra pair of hands will save you from frustrating do-overs, damaged parts, and the kind of assembly headaches that turn an exciting project into a dreaded chore.
Your greenhouse instructions are the roadmap between a pile of materials and a functional growing space. Whether you’re planning a simple cold frame or an all-season extension to your home, the quality and clarity of those PDF instructions directly impact your success. Don’t rush past the preparation stage. Read through the entire manual first, watch for common trouble spots we’ve discussed, and be realistic about the time and help you’ll need.
The homeowners who have the smoothest assembly experiences aren’t necessarily the most skilled, they’re the ones who prepared properly. They knew what tools to buy, understood which steps required two people, and had realistic expectations about the time commitment. With your instructions in hand and a solid plan in place, you’re ready to build a greenhouse that will serve your garden for years to come.